November 2016
 Rollin’ out the Red Carpet at the St. Lawrence Market
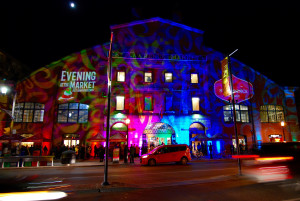
St. Lawrence Market is a piece of Toronto history. Since 1903 the Market has been a culinary focal point in the city. Earlier this month, AV Strategies partnered with Rob Laughlin of 6degrees to help execute audiovisual and production services for the sold-out, “Evening at the Market” event, where merchants came together to showcase some of their best and most extravagant culinary delights.
The City of Toronto engaged 6degrees and our AVS team to literally roll out the red carpet by installing 500 square feet of red carpet to welcome the 2,000 guests. We also lit the front façade of the building with animated colour logos and a wash of moving coloured light patterns.
 Inside, we provided audio and lighting for the DJ, jazz band, and aerial performers who were suspended from the ceiling on silks and large hoops. We also installed 5, very large, decorative chandeliers and a zoned PA system to deliver audio throughout both levels of the venue.
Our AVS Toronto team of, Antoine Lebrun, Majd Arkilo, and branch manager, Adam Hughes were amongst the crew on hand to ensure the event ran smoothly. We are extremely proud to have been involved in this very successful event at one of Toronto’s most iconic venues.
Resolution of Image Files
Many people don’t understand resolution and how it affects image quality and file size. Often I have needed a logo or photograph for a client’s project and they have downloaded or grabbed it from the Web. While high-resolution images can be found on the Web, grabbing an image directly from a Website usually results in capturing a low-res image that is unusable for other applications. Let’s talk about resolution and how to know the resolution of a given image.
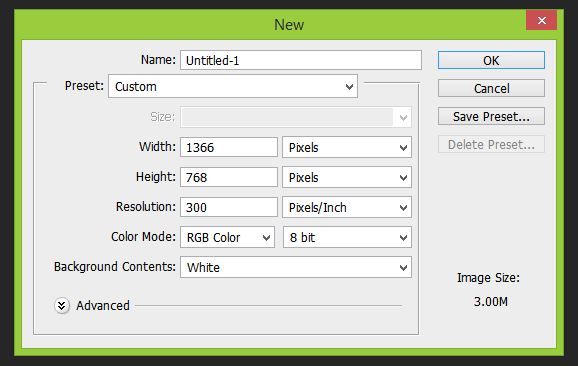
Resolution refers to the number of pixels in an image. Resolution is represented by the width and height of the image as well as the total number of pixels. For example, an image that is 1920 pixels wide and 1080 pixels high (1920×1080) contains 2,073,600 pixels (or 2.1 Megapixels). Megapixels is usually how a camera’s resolution is measured while images that we work with on our computer are usually referred to by the pixel width and height. Your computer screen is set at a particular resolution. The larger the screen, the larger you likely have your screen resolution set. Many screens today have a native resolution of 1920×1080, which is the same resolution of an HD television. Now, if your monitor is set to 1920×1080 and you open up an image that is 640X480, it will only fill up a part of your screen. If you scale the image to fit your screen it will start to lose quality because you are stretching the pixels. If you open up an image that is 2400×1350 then the image will be larger than your screen size and you would have to scale it down to fit.
There is one other measure we should talk about. That is the dpi or dots per inch. DPI is much less important than resolution. The main things to know about dpi is that if an image is going to be shown on-screen like in a PowerPoint presentation or on a Website then your image doesn’t need to be any larger than 72 dpi. Images that you intend to print should have a dpi of 300 or greater. If you are making changes to a photograph that you intend to print then you will need to ensure your image is set to 300 dpi in your photo editing software. An image set to 300 dpi makes the file size much larger so if your image is for use on-screen then reduce the dpi to 72 and the file size will be significantly smaller.
I have found that many people who are not familiar with using image editing programs don’t know how to tell the resolution of an image. Many people will ask what file size an image needs to be to be usable in a PowerPoint presentation. The reason why the file size in not a good indication of image quality is because an image that is 1920×1080 and 72 dpi will have a much smaller file size than the same size image at 300 dpi. Likewise, a 1920×1080 tiff could have a file size that is 10 times larger than 1920×1080 jpeg. The best way to tell the size of an image is to open it in Windows Photo Viewer or Windows Live Photo Gallery and right-click on the image and select [Properties]. The Info Panel will show the pixel size and dpi of the image. On a Mac you can view the image in Preview and select [Show Inspector] from the Tools menu.
I hope this blog series has helped you to understand the various image file formats and how resolution affects image quality. Many articles on the subject can be found online for those who want to read more detail on the subject.
File Formats and How They are Used
In my last blog post, I explained the difference between Vector and Raster images. This post is dedicated to explaining the most common file formats and how they are used and why to choose one format over another. Basically, all image formats are different ways of compressing an image so that the file size of the image is manageable. The trick is to compress the image so that its file size is low while retaining as much quality of the original image as possible.
There are two types of image compression; “lossy” and “lossless”. Lossless compression discards no information so it looks for efficient ways to represent an image without making compromises in its accuracy. Lossy compression formats accept some degradation in the image in order to achieve smaller file size. While the number of compression formats seems endless, some formats you may be familiar with are JPEG, TIFF, PNG, GIF, BMP, or RAW. Here are some of the attributes of the most common formats:
Bitmap (.bmp)
- A common image format in Windows programs
- Good for printing images
- No loss in quality
- Millions of colours
- Large File Size
- May not be recognized in other operating systems
TIFF – Tagged Image File Format (.tif)
- An image format recognized by most computer systems.
- Preferred by many professional printers due to its high quality.
- No loss in quality
- Millions of colours
- Supports transparency (Alpha Channel)
- Can be used in various operating systems: Windows, Mac, and Linux
- Large File Size
- Not compatible with all windows applications
JPEG – Joint Photographic Experts Group (.jpg .jpeg)
- The most common image format for use on the Web and in digital cameras.
- Small file sizes
- Information discarded is often not visible to the human eye.
- When a saving as a JPEG, most editing programs allow the choice of compression ratio. More compression = smaller file size but poorer image quality.
- Millions of colours
- Recognized by most computers and most applications
- Format used by many digital cameras
- Common format for pictures in websites
- Some loss in quality
- Does not support transparency
- Doesn’t look as good when used in professional quality printing
GIF – Graphic Interchange Format (.gif)
- The first image format to be used on the Web, GIFs are good for images with a limited number of colours, such as logos, graphs, and drawings, but are not as good for photos or complex images.
- No loss in quality
- Small file size due to method of storing image information
- Supports transparent areas
- Can be animated
- Limited to a maximum of 256 colours
PNG – Portable Network Graphic (.png)
- An image format created to be a license free improvement on GIF.
- Small file size due to compression
- No loss in quality
- Supports alpha channels allowing full and partial transparency
- Files with millions of colours are often larger than similar JPEG images
- Not yet supported in some programs
- Doesn’t support animation like GIF


